I haven't posted anything new on my blog in quite a while. Most of my time has been spent working on writing a fully function Actionscript plugin for Gedit, which will (with any luck) improve the development experience for users of Linux.
Anyway I thought I'd post some eye candy, just a simple transition between two ASTrace renders. I be plan on working on a pixel bender filter to carry out these effects in real time. A kind of one-track raytracer which optimizes a single scene with a central sphere. This should be possible with two displacement filters, one for reflection and one for refraction. For now, here is a prototype without full 3D rotation (Click to launch then move the mouse left or right to change reflectivity):
Showing posts with label raytracer. Show all posts
Showing posts with label raytracer. Show all posts
Saturday, 15 January 2011
Transparency and Reflection
Labels:
3D,
AS3,
Flash,
ray tracing,
raytracer
Monday, 1 November 2010
Some Beautiful Transparency Renders in ASTrace
My raytracing project has been on hold for a while as I have been fixing minor bugs and not really creating anything new. I am rewriting some features of the raytracer completely from scratch which will hopefully improve performance and clarity of the code. I will implement features such as bounding spheres for intersection tests, as well as possible octrees or similar to improve performance for large numbers of objects. Once the engine is working fully in flash I will port it to alchemy, and hopefully with those performance boosts the engine will be ready for distribution.
Here are a few renders showing transparency and reflection that I created last night. Both are the same scene with different sky boxes applied. You can download the full size images (2200 by 1600px) by right clicking and saving as:
Here are a few renders showing transparency and reflection that I created last night. Both are the same scene with different sky boxes applied. You can download the full size images (2200 by 1600px) by right clicking and saving as:
Labels:
AS3,
Flash,
Libraries,
ray tracing,
raytracer
Thursday, 28 October 2010
Soft Shadows in ASTrace
Here is a nice example of fully antialiased soft shadows. The source light uses about 20 seed points spread out using a pseudo-random function, to produce reasonable effects.
Wednesday, 27 October 2010
Improved Supersampling and Antialiasing
I decided to improve the supersampling/antialiasing methods in my raytracer. Previously I applied a blur filter to the image after upsizing and then returned the image to its original size. This is not a very realistic or accurate antialiasing method so I decided to add some real supersampling to the raytracer. The two images below both have the same resolution, but the image on the right appears more realistic with fewer jagged edges. This is achieved by firing multiple rays for each pixel, and based on their relative position, calculate their contribution to the colour of that pixel. The obvious downside to this method is a largely increased rendering time, proportional to the number of rays per pixel. This means that 16 rays per pixel takes 16 times longer than a single ray. Quality definitely comes at a computational price. I think randomising the rays may improve the antialiased image quality, instead of firing them across a uniform grid and I will look into that.
The next updates are likely to be cloud maps and a sun object (infinite directional lighting).
The next updates are likely to be cloud maps and a sun object (infinite directional lighting).
Labels:
3D,
AS3,
Libraries,
ray tracing,
raytracer
Monday, 25 October 2010
Perlin Texturing in ASTrace
I've added simplex noise volumetric texturing to ASTrace. I found this nice little Simplex noise class by Sjeiti and implemented it in the library. Simplex is slightly faster than Perlin noise in 3 and 4 dimensions so it is ideal to use as a volumetric texture for primitives in the tracer, here are a few examples:
As an extension I decided to create an animation using 4-dimensional simplex noise, just click on the image to launch it. I am planning on implementing a cloud sphere, and this would be ideal for animations of clouds:
As an extension I decided to create an animation using 4-dimensional simplex noise, just click on the image to launch it. I am planning on implementing a cloud sphere, and this would be ideal for animations of clouds:
Labels:
3D,
AS3,
Libraries,
ray tracing,
raytracer
Thursday, 21 October 2010
Material Properties
Choosing the right material to represent a particular object is important when producing realistic 3D graphics. Factors like refractive index, specularity, and reflectivity all affect how we perceive an object both in the real world and on screen, so ideally the real world case should be simulated as closely as possible in its computer based counterpart. The three images below show how differing physical features completely change the appearance of a scene. In the top image the sphere is 100% reflective, in the second it is partly transmissive and partly reflective and in the last image, the sphere is fully transmissive with a refractive index of around 1.08. I am pleased with the results I am getting from the raytracer, but adding more features increases the render time dramatically, especially for large numbers of objects. I am looking into porting the library to C++ for use in alchemy, which would show a dramatic increase in speed, possibly rendering scenes like the one below in real time. Till then here is the library.


Labels:
3D,
AS3,
Libraries,
ray tracing,
raytracer
ASTrace Pre Release
Although the library is nowhere near complete, I thought I would release a beta to see what you think. At this stage feedback would be really useful, including any suggestions you might have about extensions to the project. I should note that there is no documentation as of yet, this will be coming as soon as I manage to get asdoc to run properly. There should be plenty of scope for you to play around with the library, it'd be great if you could send me some of your renders.
Here is a link to the library: ASTRACE
and here are some of my favourite renders using the library:
Here is a link to the library: ASTRACE
and here are some of my favourite renders using the library:
 |  |
 |  |
 |  |
Labels:
3D,
AS3,
Libraries,
ray tracing,
raytracer,
Source Code
Thursday, 23 September 2010
Reflective Recursion
With the exception of refraction, which I am not yet happy with (total internal reflection problems), the raytracer is coming together fantastically. This is my favourite render so far featuring diffuse and specular reflections with 2 pass antialiasing. The image was rendered at 2200x1600 and cropped to give the final image:
Not bad for flash, about 30 minutes render time.
Once mathematical problems with internal reflection are fixed I will be releasing the library under an open source license, let me know if you have any last minute requests!
Below is a similar image but rendered to 3300x2400 pixels in about 90 minutes:
Labels:
AS3,
ray tracing,
raytracer
Tuesday, 31 August 2010
Ray Tracing Library AS3
About a year ago I wrote a ray tracer. I've decided to the same thing again, building from the ground up, and taking a completely OOP approach - which I didn't do before. I was very pleased with previous results, but given the lack of structure implementing certain features became a real headache, and a lot of code had to be rewritten each time I wanted to make a small change.
At the same time I will try to speed up the engine, try to stick to bitwise operators and vectors whenever possible. With any luck it'll be up and running in the next few weeks, but I will keep you updated along the way.
Here are some screenshots from the previous ray tracer:


At the same time I will try to speed up the engine, try to stick to bitwise operators and vectors whenever possible. With any luck it'll be up and running in the next few weeks, but I will keep you updated along the way.
Here are some screenshots from the previous ray tracer:


Labels:
AS3,
ray tracing,
raytracer
Thursday, 4 February 2010
Chrome Effect Ray Tracer
Applying a chrome filter to a finished ray trace render creates an amazing effect. Take a look for yourself. I'm in the process of developing online software where you'll be able to create simple 3D scenes and raytrace them with a number of effects; including anaglyph 3D, chrome and a few more! This is my screensaver at the moment:
Labels:
3D,
AS3,
Flash,
ray tracing,
raytracer
Saturday, 16 January 2010
Anaglyph Raytracing
I made a few changes to the raytracer I've been designing to create anaglyph images, that is two channel 3D images. The changes are very simple, literally two black and white images are drawn from slightly different angles, then one is tinted in cyan, and the other red. I don't have any 3D glasses but it should work. If anyone has some check out the test image below!
I'll try to produce some more images like this and get a pair of glasses to test with. Imagine realtime anaglyph raytracing!
I'll try to produce some more images like this and get a pair of glasses to test with. Imagine realtime anaglyph raytracing!
Wednesday, 30 December 2009
How To Build A Raytracer: Part II
In the previous post we looked at some of the fundamental ideas behind raytracing and saw some stunning renders created using the technique. In this post we'll start to take a look at the camera, and how to create a three dimensional scene.
The Camera
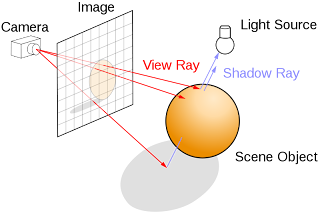
To start with lets create a camera at a position in space [camX,camY,camZ]. This camera can move up, down, left, right, in and out around your scene, and is where all of the initial rays are fired from. The image below shows how the rays exit the camera through the scene. It is clear that we want our rays to pass from the camera through the image, as shown in this diagram, but how do we find these rays! For a horizontal camera with no rotational properties this is actually very easy, so lets take a look at how to do it.
 Traditionally cameras have a property called the field of view. This is related to the range of angles that a camera can see. A fisheye lens, for example, has a large field of view (180 degrees?). High field of views can result in image curving and I've found that the optimum angle between the horizontal and the top vertical for ray tracing is around π/6 degrees giving a field of view of π/3 or 60 degrees.
Once we've decided on a field of view for our ray tracer we can determine the distance between the image plane and the camera. Remember, unless the image is completely square the field of view in the vertical range and the horizontal range will be different. Programmatically, creating a new variable called the scale of view makes things far easier where:
var scaleX:Number = Math.tan(fovX);
var scaleY:Number = Math.tan(fovY/(scenewidth/sceneheight));
In the above actionscript, scene width and scene height are the pixel height and width of the image you want to create. Once we have our scales of view we can start firing rays. In a ray tracer rays are fired through every single pixel in the image. Although it results in pixel perfect images the computation required can also be rather large for high resolutions. This is why ray tracers are not currently used in real time applications.
So the next step in the ray tracing algorithm is to cycle through each pixel creating rays. I suggest using two embedded for loops although there are other ways of doing this depending on the structure of your program:
for(var i:int = 0; i < scenewidth; i++)
{
for(var j:int = 0; j
{
rayX = scaleX*(2*i-scenewidth)/scenewidth;
rayY = scaleY*(2*j-sceneheight)/sceneheight;
rayZ = 1;
// After we have created the ray we calculate collisions - and then render the pixel
}
}
The above is a simple example of creating all the rays needed for a scene.
In vector mathematics a lot of calculations rely on the vector being unitary (meaning of length 1). To fix this just take the modulus of (rayX, rayY, rayZ) and divide each of rayX, rayY, and rayZ by this modulus.
This simple model can be extended by adding yaw and pitch, and for the really enthusiastic even roll! These are 3 types of rotation. The simplest way to create rotations is to rotate the ray vectors around the camera's location once they have been generated using matrix transforms. This will fit into a later tutorial.
Stay tuned for the next in the series soon!
The Camera
To start with lets create a camera at a position in space [camX,camY,camZ]. This camera can move up, down, left, right, in and out around your scene, and is where all of the initial rays are fired from. The image below shows how the rays exit the camera through the scene. It is clear that we want our rays to pass from the camera through the image, as shown in this diagram, but how do we find these rays! For a horizontal camera with no rotational properties this is actually very easy, so lets take a look at how to do it.
 Traditionally cameras have a property called the field of view. This is related to the range of angles that a camera can see. A fisheye lens, for example, has a large field of view (180 degrees?). High field of views can result in image curving and I've found that the optimum angle between the horizontal and the top vertical for ray tracing is around π/6 degrees giving a field of view of π/3 or 60 degrees.
Once we've decided on a field of view for our ray tracer we can determine the distance between the image plane and the camera. Remember, unless the image is completely square the field of view in the vertical range and the horizontal range will be different. Programmatically, creating a new variable called the scale of view makes things far easier where:
var scaleX:Number = Math.tan(fovX);
var scaleY:Number = Math.tan(fovY/(scenewidth/sceneheight));
In the above actionscript, scene width and scene height are the pixel height and width of the image you want to create. Once we have our scales of view we can start firing rays. In a ray tracer rays are fired through every single pixel in the image. Although it results in pixel perfect images the computation required can also be rather large for high resolutions. This is why ray tracers are not currently used in real time applications.
So the next step in the ray tracing algorithm is to cycle through each pixel creating rays. I suggest using two embedded for loops although there are other ways of doing this depending on the structure of your program:
for(var i:int = 0; i < scenewidth; i++)
{
for(var j:int = 0; j
{
rayX = scaleX*(2*i-scenewidth)/scenewidth;
rayY = scaleY*(2*j-sceneheight)/sceneheight;
rayZ = 1;
// After we have created the ray we calculate collisions - and then render the pixel
}
}
The above is a simple example of creating all the rays needed for a scene.
In vector mathematics a lot of calculations rely on the vector being unitary (meaning of length 1). To fix this just take the modulus of (rayX, rayY, rayZ) and divide each of rayX, rayY, and rayZ by this modulus.
This simple model can be extended by adding yaw and pitch, and for the really enthusiastic even roll! These are 3 types of rotation. The simplest way to create rotations is to rotate the ray vectors around the camera's location once they have been generated using matrix transforms. This will fit into a later tutorial.
Stay tuned for the next in the series soon!
How To Build A Raytracer: Part I
This is the first of what I hope to be a few posts that describe the fundamental theories behind building a raytracer. I will specifically look at how to build one in flash using AS3, but the theories should be easily transferrable to any other scripting language so whether you use C++ and openGL, Java, Python or AS3 this set of tutorials will point you in the right direction.
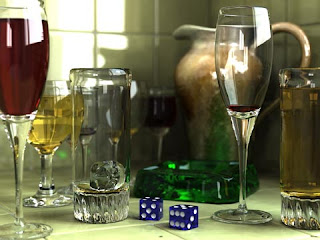 This is not just source code that I'm posting up, I will describe everything that I feel is needed to build a ray tracing engine without necessarily giving too much code. In the end I feel this is a far more rewarding way of learning flash and creating new projects, and is how I have taught myself in the past. Certain aspects of maths throughout the tutorial may be of a reasonable level but most high school vector course books should give enough knowhow to be able to see what is going on. So lets begin.
Note: the image to the right shows the kinds of lighting effects a raytracer can produce.
What is a raytracer
In nature a ray of light travels from a light source - interacts with some objects and either disappears into space or reaches our eyes. What we see depends on what the ray has collided with on the way to our eye. For example taking a light source to be the sun, trillions of rays hit earth every second, each of these reflects, refracts and is absorbed by trees, by roads, by cars and by other people. For us, the onlookers, only a tiny fraction of these rays hit our eyes, but when they do, the individual rays (photons) create the scene we see in front of us on the back of our eyes ready for our brains to untangle and interpret.
The idea of a raytracer - at least in the sense of this tutorial - takes what happens in nature and reverses all of the processes. Rays are created in the back of our eyes and are fired in a range of directions at our scene. Each ray passes through a point in our image and will either pass through our scene or hit an object. The image to the left helped me understand the ray firing process. When a ray hits an object there are 3 possibilities:
(i) The ray absorbs the ray
(ii) The ray reflects the ray
(iii) The ray refracts the ray
In the first case, a new ray is case from the point where the ray scene collision occurred, in the direction of any light sources in the scene. If there are no objects in the way then the object is lit, otherwise the object is in shadow.
In the second case a new ray can be cast depending on the surface normal of the object which can interact with the scene again. The ray can keep colliding with objects up to an arbitrary number of times so theoretically a ray could bounce between objects forever.
In the third case a new ray can be cast depending on the surface normal and refractive index of the material. As above this ray can continue to interact with the scene.
These three cases are not mutually exclusive. In a scene there can be any amount of refraction, refraction, absorption and shadowing, which gives ray tracers their realism. Take a look at the top image for examples of all three, and the image by pixar below is another example.
We've seen that a raytracer is just a way to render a scene which is physically realistic and can produce effects like shadowing, reflection and refraction in a far simpler way than many other rendering methods.
In my next post I'll explain how the camera works and how to set up our first scene.
Wednesday, 16 December 2009
Flash Ray Tracer Reflections
Finally managed to get reflections properly working in my actionscript raytracer. The mathematics behind reflections is very simple. Given an incoming light ray V, and a surface normal N, we can calculate the reflected light ray R using:
a = V.N
R = V + 2*a*N
I applied this theory to the ray tracer and the results are beautiful. Its amazing how much realism a few shadows and reflections can create! The number of reflections obviously changes the image realism. The images below show 1, 2 and 3 reflections per ray. Surprisingly there really isn't much of a reduction in performance - and for the purposes of a flash raytracer 3 reflections should be plenty!
Just need to add some functionality for box reflection and then I'll set the engine rendering some nice scenes!
One further extension I might set myself is diffuse reflections. Instead of light being reflected directly along the normal, there could be random fluctuations in the reflection vector. I think this could produce quite a nice wave effect. I'll keep you posted!
On a performance note the image with 3 reflections took just over 2 minutes to render in 1600x1600 with no real optimisation. For a resolution of 400x400 pixels it takes about 2.5 seconds. Not too bad at all in my opinion!
Update: Here are a few fuzzy shots. The first one is less fuzzy and the second one is more fuzzy. Quite an interesting effect I think:
Decided to go a bit mad and rendered a rather large image with a load of boxes and reflective spheres. Inspired by SuperJers PixelMachine, but rendered completely using flash and AS3, not OpenGL and C++. Here it is (Something has gone wrong with the reflections of the boxes - there is no shadowing - but I didn't have the heart to stop it once it was half way through!):
Here is another nice one, 2880 by 2880 pixels, back to the original room but with the reflection stuff added. Looks quite nice in the super high resolution!
Update: I've rendered few more large reflective images - there is still something slightly wrong with the reflections I think, check them out:
Labels:
3D,
AS3,
Flash,
ray tracing,
raytracer
Tuesday, 15 December 2009
New Raytracer Features
I've been working on this now that term is over. The features I've added are diffuse shadows - multiple directional lighting - and box rendering. Here are a few renders. In order they show a low resolution diffuse shadow render, a high resolution render with a cube, and a high resolution render without global lighting with two point lights:
And here is a render I like with 4 lights:
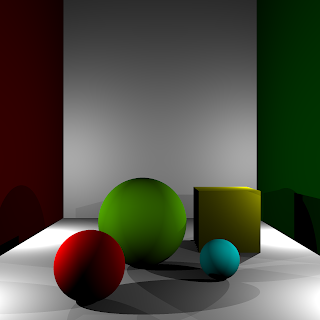
Update: Deciding to take the whole concept a bit further and show you that the ray tracer is not just good for rendering spheres and cubes I rendered a really simple office scene of some description - here it is:
And here is a render I like with 4 lights:

Update: Deciding to take the whole concept a bit further and show you that the ray tracer is not just good for rendering spheres and cubes I rendered a really simple office scene of some description - here it is:
Update: Finally started looking at reflections. I've got the maths bit of it sorted. Just got to look at the way I'm structuring my code to help it make a bit more sense. Here is my first result, to show that the angles work!
Update: Same again but this time with 50 or so spheres floating around in the sky - and a reflective floor. Nice to see it almost working!
Labels:
3D,
AS3,
Flash,
ray tracing,
raytracer
Friday, 11 December 2009
Quick example of real-time raytracing in flash
Just a quick low res, and completely un-optimized example of an animated version of the ray tracer I've been working on. The light source moves in real time and you can move the camera around with the mouse.
Just click the image below to launch it!
Just click the image below to launch it!
Labels:
3D,
AS3,
Flash,
ray tracing,
raytracer
Friday, 4 December 2009
Plane Intersections Added to Flash Raytracer
I was working late on this last night when I should have been doing coursework. Anyway I managed to get plane intersections in the AS3. The maths was actually very simple. I'm still working on reflections so stay tuned! Below is a nice example of spheres and planes being rendered. Total time about 15 seconds, 1100 x 800 pixels.
Tuesday, 1 December 2009
First Screenshots of my AS3 Raytracer
After writing a really simple ray tracer to render the Mandelbulb in my last post, I thought I'd write a slightly more advanced one, with more accurate shadows, reflections and all things nice ray tracers have.
I started just getting the raytracer to draw some spheres, but the results weren't very pretty. I added some shadows and some distance based lighting and they began to get a bit better.
Anyway here are the first screenshots. Once I'm at a stage where I'm happy with everything and know that I understand it I'll write a tutorial covering the fundamentals.
First image rendered with shadows - no distance lighting but shadows work
Another similar example
Trying to get distance decay of lighting intensity but using the wrong vector. This causes brightness where there are more spheres for some weird reason!
Fixed it - Shadows look good and added a load more spheres!
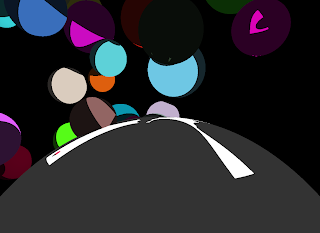
I'm starting to like this!
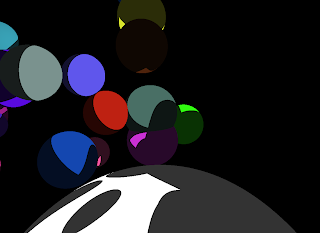
So the next step for this is reflection. This just involves firing another ray when a collision is found and checking for collisions. For those who are interested the resolution is 1100x800 pixels, and the images render in about 5 seconds. Not too bad at all!
Stay tuned for updates.
Update: Just a thought, I think altering brightness depending on the direction of the normal of a plane to the light source would increase realism, also create effects like specularity, I don't know but I'll give it a go and post some screens of it!
Update: Here are a few shots of directional lighting in action! I have to say for such a minor change the realism massively increases. Instead of clear shadow lines, they are all a lot more diffuse! Lovely.
A day time shot:
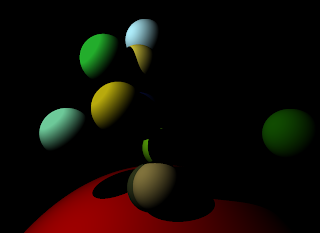
Update: Just rewrote almost everything, should make it easier to add new features though. Its looking good, nearly got reflections working, then I'll add some other objects (probably boxes and planes).
Subscribe to:
Posts (Atom)


