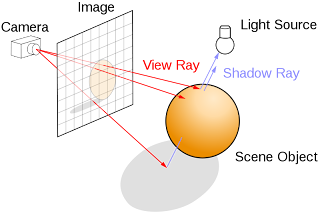
The Camera
To start with lets create a camera at a position in space [camX,camY,camZ]. This camera can move up, down, left, right, in and out around your scene, and is where all of the initial rays are fired from. The image below shows how the rays exit the camera through the scene. It is clear that we want our rays to pass from the camera through the image, as shown in this diagram, but how do we find these rays! For a horizontal camera with no rotational properties this is actually very easy, so lets take a look at how to do it.
 Traditionally cameras have a property called the field of view. This is related to the range of angles that a camera can see. A fisheye lens, for example, has a large field of view (180 degrees?). High field of views can result in image curving and I've found that the optimum angle between the horizontal and the top vertical for ray tracing is around π/6 degrees giving a field of view of π/3 or 60 degrees.
Once we've decided on a field of view for our ray tracer we can determine the distance between the image plane and the camera. Remember, unless the image is completely square the field of view in the vertical range and the horizontal range will be different. Programmatically, creating a new variable called the scale of view makes things far easier where:
var scaleX:Number = Math.tan(fovX);
var scaleY:Number = Math.tan(fovY/(scenewidth/sceneheight));
In the above actionscript, scene width and scene height are the pixel height and width of the image you want to create. Once we have our scales of view we can start firing rays. In a ray tracer rays are fired through every single pixel in the image. Although it results in pixel perfect images the computation required can also be rather large for high resolutions. This is why ray tracers are not currently used in real time applications.
So the next step in the ray tracing algorithm is to cycle through each pixel creating rays. I suggest using two embedded for loops although there are other ways of doing this depending on the structure of your program:
for(var i:int = 0; i < scenewidth; i++)
{
for(var j:int = 0; j
{
rayX = scaleX*(2*i-scenewidth)/scenewidth;
rayY = scaleY*(2*j-sceneheight)/sceneheight;
rayZ = 1;
// After we have created the ray we calculate collisions - and then render the pixel
}
}
The above is a simple example of creating all the rays needed for a scene.
In vector mathematics a lot of calculations rely on the vector being unitary (meaning of length 1). To fix this just take the modulus of (rayX, rayY, rayZ) and divide each of rayX, rayY, and rayZ by this modulus.
This simple model can be extended by adding yaw and pitch, and for the really enthusiastic even roll! These are 3 types of rotation. The simplest way to create rotations is to rotate the ray vectors around the camera's location once they have been generated using matrix transforms. This will fit into a later tutorial.
Stay tuned for the next in the series soon!
Where the fuck is part 3
ReplyDeleteSo rude.
ReplyDelete